Which Is Easier To Make: Gutters or Quilts?
All about Gutters
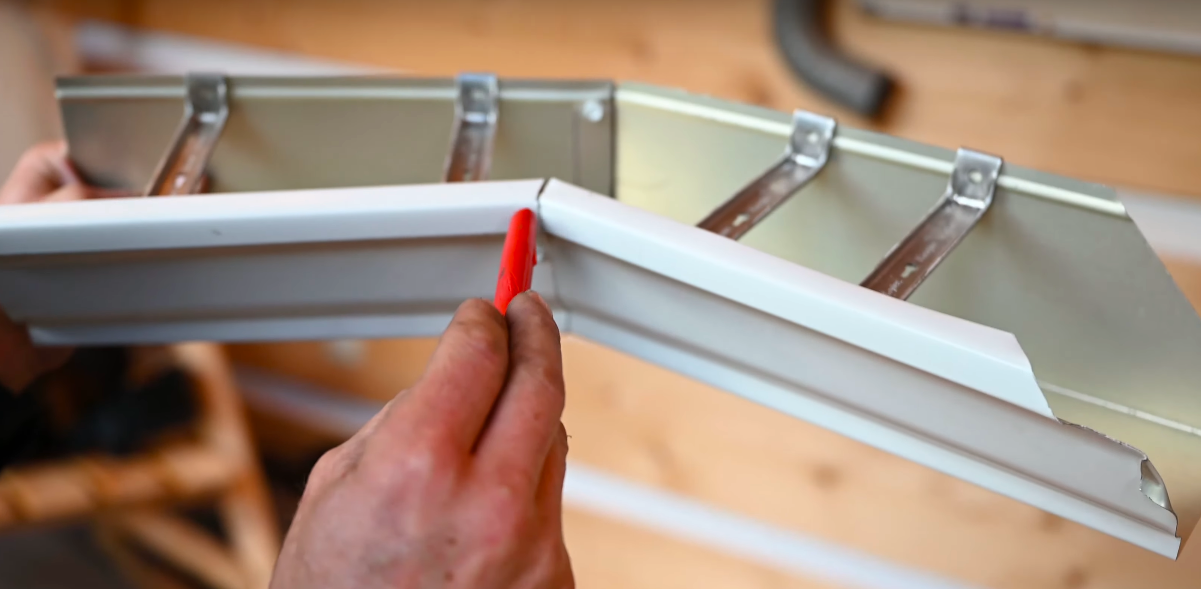
A detailed tutorial for mounting DIY gutters equipped with corrugated downspouts and ornamental cast-aluminum brackets.
Rain gutters and downspouts are required for residences in the majority of the country in order to collect and remove rainwater. Without them, water would likely flow into the basement or crawlspace, erode the soil surrounding the foundation, and smear dirt on the siding.
Although professionals often install gutters, there’s no reason you can’t do it yourself. Home improvement stores, lumberyards, and companies that provide roofing supplies have all the necessary supplies and equipment in stock. Additionally, if you’re going to repair your gutters and downspouts, you might as well improve the rainwater system’s overall appearance and functionality.
Here, we’ll demonstrate how to set up replica half-round gutters that are perfect duplicates of the dimensions and design of gutters found on older homes. Corrugated downspouts and ornamental cast-aluminum brackets are included in this system.
Overview on Rain Gutters
Many homeowners continue to use their damaged, leaking gutters because they do not see how the benefits of new gutters would outweigh the work needed to replace them.
What Happens If You Don’t Have Gutters?
Without a gutter, rainwater that falls from the roof and strikes the ground could harm the siding and trim of your home. It’s also possible for the water to seep into your basement.
Cost of Rain Gutters
His business creates eye-catching, half-round replica gutters that have appeared on numerous This Old House TV programs. The homeowners spray-painted the cast-aluminum, closed-curl brackets antique gold before attaching the dark-green metal gutters to the fascia ($2.75 per linear foot, supplies alone). 4-inch-diameter corrugated aluminum downspouts ($1.75 per linear foot), which were purchased in white to match the home trim, are located at the ends of the gutters.
Make sure gutters slope toward a downspout (12 inch for every 10 feet) to guarantee efficient gutter drainage. It is ideal to pitch the gutter down from the centre to a downspout at each end of runs longer than 40 feet. Alternatively, you might slope the gutters from either end to a single downspout that is positioned in the middle of the run. Before acquiring gutters and accessories, decide what will work the best for your home.
Step to Install Gutters
- Layout lines quickly
- Put fascia brackets in place.
- Lengthened the gutter saw
- Add end caps
- Drill downspout holes
- Place gutters
- Corner form strip-miter junction
- Attach the downspout to the gutter
All about Quilts
Prepare to make your first quilt without any prior sewing experience! Discover the basics with our quilting primer, and you’ll be hooked in no time.
One of life’s greatest pleasures is making your own quilts, and we’re here to get you addicted to creating cozy quilt projects. When we discuss quilting, we are especially referring to the step in the process where you sew layers of fabric together to create a quilt. These abilities are used by quilters to create exquisite heirloom quilts, lap quilts, micro quilts, quilted clothing, and smaller home décor items like pillows and table settings. Since a recent wave of new makers have taken up sewing, there has never been a better opportunity to learn this trade that has been handed down from generation to generation for millennia. We’re here to walk you through the process in this crucial quilting tutorial for beginners.
The good news is that you can try it even if you lack sewing confidence. You can even make an entire quilt by hand without using a sewing machine, which has the extra benefit of being incredibly therapeutic. In this quilting for beginners guide, we’ll walk you through all the fundamentals of creating your first quilt (by hand or machine).
Quilting essentials for beginners
Here are a few supplies that you’ll find come in handy when making your first quilt…
- Tape measure
- Pins
- Quilting Ruler
- Scisssors
- Steam iron and board
- Sewing machine
- Fabric
- Fabric or chalk markers
- Fabric glue
How to make a quilt
Okay, everyone, get set! We’ll walk you through the process of creating a quilt step by step. We’ll demonstrate how to construct a straightforward patchwork quilt top, transform it into a quilt sandwich, and either machine quilt it or hand quilt it.
Making a patchwork quilt top: steps
You must cut cloth into squares or other shapes, then stitch them together to make your “quilt top” before you can start quilting. There are many different methods to organize your fabric shapes, from curved piecing to log cabin quilt blocks, but because this article is about quilting for beginners, we’ll show you how to get started with a four-patch quilt block.
To make a sort of Battenberg cake, you just cut out a bunch of fabric squares and stitch them together into larger squares with four units each. To sew, you can either use a sewing machine or a straightforward running stitch when stitching by hand.
Step 1
Four equal-sized squares of fabric should be cut out to form the foundation of your Four Patch block. You have the option of choosing two distinct colors or four distinct hues. Try cutting your squares to be 8x8in or 12x12in if this is your first quilt.
Step 2
Squares should be placed right sides together. To attach them, use a 14-inch seam to sew around the edge after pinning them together. Open or to one side, press the seam. Make two pairs by repeating with the remaining squares.
Step 3
Now, align the edges of the top and bottom edges of the two pairs of squares, and make sure the seams in the middle match our illustration. Together, pin and sew, and then press the seam.
Step 4
Place the wadding on top of the ironed quilt top, such that the wadding and backing are visible on all sides. Using masking tape, secure the layers to the surface.
Step 5
Work from the center outward in a grid pattern with lines spaced about 4 in (10 cm) apart to tack all three layers together. To secure the layers, you can also use spray basting glue, safety pins, or pins.
How to quilt
It’s time to make your sandwich into a quilt now that you’ve finished making it. You have a variety of quilting options at your disposal, including machine or hand stitching, straight lines stitched “in the ditch,” geometric patterns, and free-motion stitching.
You might find it useful to mark your quilting design on your fabric before or after the quilt sandwich is put together before you begin to quilt. Pencil, chalk, erasable pens, templates, and masking tape are some marking techniques.
Straight-line quilting is the simplest to do when you first start out. Before you begin stitching, you simply need to mark the very minimum, and you can gradually add designs as you go. The following are just a few of our favourite techniques.
- In-the-ditch quilting
- Outline or contour quilting
- Grid or crosshatch quilting
- Echo quilting
Mark the designs you wish to quilt before you begin sewing for a tidy finish. You might not require markers for patchwork or in-the-ditch quilting, but for other techniques, they serve as a useful guide. Simple quilting lines can be drawn with a ruler, a pencil, or an erasable marker. Masking tape edges can also be drawn with tailor’s chalk. Another approach is to create a brief crease with a “hera” marker or blunt needle, which you would then quilt over.